| To avoid confusion and multiple versions all
species data is entered centrally by Paul Buckland. If there is anything
you would like to add, including new taxa, then please contact Paul
at paul.buckland (at) bugscep.com for
information on how to proceed. |
| If you are especially interested in entering new species and ecological
data then please contact us to talk about future directions for BugsCEP
- either through Paul (above) or phil (at) bugscep.com |
|
Create a new site (and add
summary information)
|
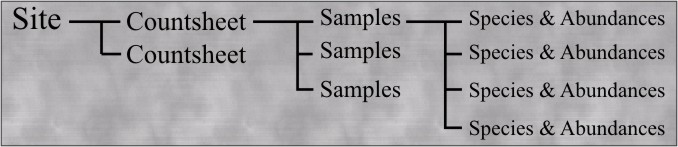
Sites are the highest level in the hierarchy
of fossil/location based data storage, under which samples, species
lists, dates and abundances are stored (as shown below).
A limited amount of summary information, including any number of references,
can be assigned to a site.
|
|
|
- Open the Site Manager from the main toolbar.
- Click the [Create New Site] Button.
- Enter a name for the site in the popup box, and click [OK].
- The Site Information screen will open - shown below - so that
you can enter summary data.
Note that you will need an Administrator password to change
this data later, or delete the site. This is so that students
may create their own sites, but not alter any existing data.
|
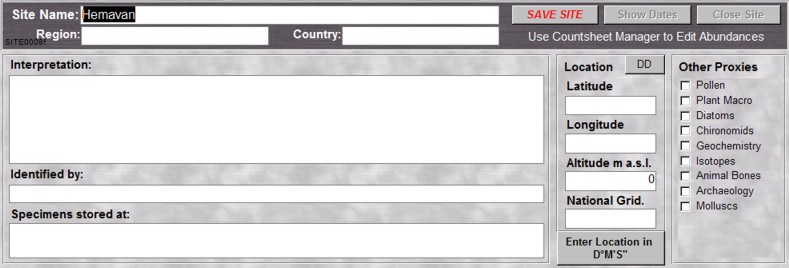 |
- Interpretation - summarise the site, and add any other
data that will enable others to understand the relevance of the
countsheet data. Include anything that doesn't fit anywhere else
in this box.
- Identified by - name of the person(s) that identified
the species.
- Specimens stored at - location of the identified material
(i.e. the contents of the samples)
- Location - geographical reference - this will be used
through GIS later.
- Latitude & Longitude - either enter as decimal degrees
(+/-180°E/W, +/-90°N/S)* or click the [Enter Location
in D°M'S"] to enter it in Degrees, Minutes and Seconds
form.
The [DD]/[DMS] button allows you to toggle the lat/long
view.
- Altitude - in metres above sea level.
- National Grid Reference if available.
- Other Proxies - check boxes to indicate any other palaeo
evidence available for the site.
|
- To add a reference to the site click the [Add Reference] button
and follow the instructions below.
- Click [SAVE SITE] when finished.
Remember - you will not be able to edit this data later without
an Administrator password. Contact the developers for more information.
|
|
Add samples, species
and abundances to a site
|
|
All abundance data is stored in 'countsheets'.
It is up to the user to decide how to use these, but we recomend
that each countsheet represents a cohesive sampling/analysis activity
for a site. For example:
- a particular year's pitfall trapping
- the data from a year's excavation at an archaeological site
- a particular author's reworking of previously identified material
The 'Sample' is the nodal unit - all abundances
and dates are tied to samples, and cannot exist without one. Similarly
a zero abundance species cannot be stored - it must have an abundance
in a sample. BugsCEP can create a dummy sample where the abundance
of each species is 1 on request.
See the diagram above
for a graphical explanation of site-sample-data hierarchy.
There are two stages involved in the abundance data
entry process:
(i) Create a countsheet
(ii) and data to the countsheet (click here
to skip stage i)
|
- Select the site in the Site Manager (available from the main
toolbar).
- Click the [Manage Countsheets & Create Reports] button.
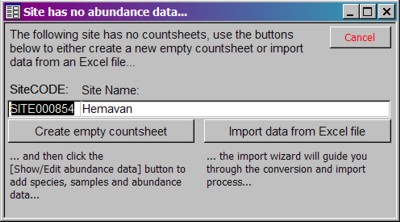
If the site contains no countsheets (e.g. a newly created site)
then you will be presented with the popup to the right, giving
you the option to either create a new countsheet or import
data.
Click here to see how to import data or
continue reading to add data in BugsCEP.
|
|
- Click [Create empty countsheet], and a new blank countsheet
will be created for the site.
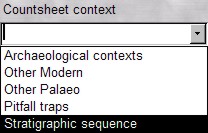
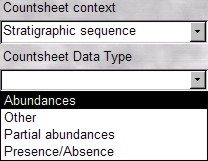
- Give the countsheet a name - THIS IS IMPORTANT as it allows
you to easily identify the countsheet in other parts of the program
- and then select the appropriate descriptive information from
the drop down boxes for 'Context' and 'Data Type', as shown below.
|
|
|
|
- Click [Save], and you now have an empty countsheet ready to
receive sample, species and abundance data.
|
- Click the [Show/Edit abundance
data] button to open the Countsheet Explorer - a spreadsheet
like interface for the entry of abundance data.
You can delete the 'Please add species and samples' entry using
the instructions below...
- To create/modify a species list:
- Click the [Manage Species List] button to open the Species
List Editor
- To add a species (taxon):
- use the 'Genus' dropdown box to find the Genus
- select the species from the (now updated) 'Species in
Genus' list
- either double click on it in the list, or click the
[Add to Species List] button
- To replace a species (taxon):
- select the species to be replaced in the 'Current
Species List' to the right of the form
- Use the 'Genus' box and 'Species in Genus' list to find
the species to replace it with and select it (single
click)
- click the [Replace Selected] button
- To delete a species (taxon):
- select the species to be deleted in the 'Current
Species List' to the right of the form
- Click the [Delete Selected] button
- When you are finished click the [Apply Changes] button
so save the species list. Remember to add at least
one sample with abundance values for every species - otherwise
they will not be saved between editing sessions.
Notes for species list editing:
- The Synonyms Browser is available through a button at the
bottom left - it allows you to look up synonyms, but not move
to them in the Species List Editor (sorry - we'll fix this
later).
- When creating long lists APPLY CHANGES OFTEN! At
least every 30 species or so.
- You can limit the species available for addition to only
those with climate data by selecting the [ ] Show only MCR
Species checkbox.
|
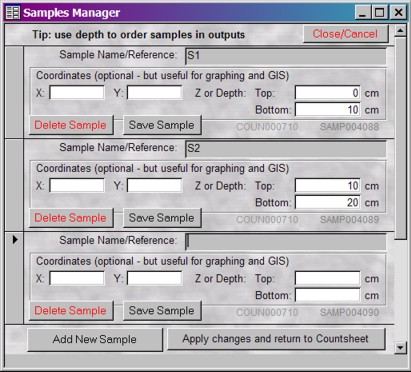
- To add/modify samples:
- From the Countsheet Explorer click the [Manage Samples]
button
- To add a sample click the [Add New Sample] button, and give
the sample a name/reference, and fill in coordinates and depth
data if relevant.
Important!
Sample Names must begin with a letter to ensure all outputs from BugsCEP work.
We recommend adding samples in the order you would like
them output on any diagrams - BugsCEP does not yet sort by
depth or sample name in all areas.
- Remeber to always click [Save Sample] after entering or
editing samples.
- Click [Apply changes and return to Countsheet] when all
samples are entered
(You can add more samples, or edit existing ones at a later
date)
|
 |
- You are now ready to enter abundance
data in the cells of the spreadsheet shown in the Countsheet
Explorer.
- Click the [Save Changes & Update Database] button when finished
- but read the notes below first!
Clicking [Cancel/Close] will abandon all the changes
made since you entered this session of the Countsheet Explorer.
Notes for abundances:
- Zero abundance species cannot be saved - make sure that every
species has a value for at least one sample, even if it is just
'1' to indicate presence. In fact, BugsCEP will not let you save
the countsheet until this is done - but it will let you know which
species are the problem.
- Samples may be saved without any abundance values.
- Click the [Create 'Presence' dummey sample] button to create
a pseudosample indicating the presence of each species at a site.
|
| |
|
Import abundance data into a site
|
|
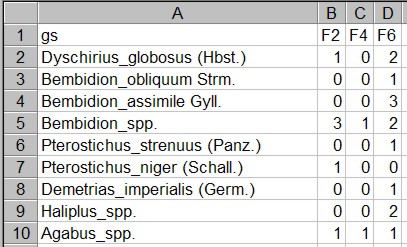
BugsCEP can import data from MS Excel files
as long as:
i) The first column (A) contains species names in the format 'Genus
species authority'
(authority can be omitted).
ii) The remaining columns contain abundance data with sample names
in the first row (1).
An example is given to the right - a countsheet
created by the previous version of Bugs.
See the notes below
for more format tips.
|
|
- Select the site in the Site Manager
(available from the main toolbar)
- Click the [Manage Countsheets & Create Reports] button.
If the site contains no countsheets (e.g. a newly created site)
then you will be presented with the popup to the right, giving
you the option to either create a new countsheet or import
data.
Click the [Import data from Excel file] button.
|
 |
- The BugsCEP Import Wizard will open.
Import is relatively simple, and follows an ordered process indicated
by the numbers on the interface (see screenshots below). The buttons
cannot be clicked in the wrong order.
|
|
|
- Follow the numbers, and click the buttons:
- [Select countsheet for import] - will open the 'Open
file' dialog box' with which you can locate your file.
- If the file is not in the standard BugsCEP format
(i.e. one exported by BugsCEP) then you will be informed,
and asked whether you would like to try to convert it
- click [YES] to do so, and click
here to follow see instructions for conversion.
- If the file is in BugsCEP format then it will be
imported directly and the species list will be displayed
underneath the [Select countsheet...] button.
Button 2 will now become active.
- [Extract Sample Names] - retrieves the sample names
from the first row of the spreadsheet.
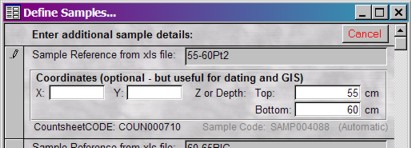
- [Enter Sample Attributes] - opens a popup box to
allow you to add sample coordinates and depth.
|
|
|
- [Import abundance values] - extracts the abundance
data from the spreadsheet, an dinforms you how many values were
imported on completion.
- [Review imported Abundances] - an optional stage to allow
you to check that the data came over correctly
- Use the drop down boxes to select the appropriate countsheet
metadata
|
| |
 &
& 
|
- [Attach to Site] - the final stage links the imported data to
the selected site.
On completion the imported countsheet will be shown in the Countsheet
Manager.
|
|
Important notes for importing files
- Make sure the abundace area of your spreadsheet is formatted
as numbers, and really includes numbers. Excel sometimes
retains other formats even if you apply the number format. To
be really sure, either copy and paste special (values) the data
into a new workbook, or use a tool such as PopTools to enforce
the formatting.
- BugsCEP will not accept anything other than numbers in the abundance
cells
- for example: >10; some; x; etc. are not valid data for BugsCEP.
If you must use such notation, then convert it something numerical
and includes explanatory notes in the site summary information.
Be really careful when using statistics with these values!
- Blank lines before the end of the import file will lead to everything
below it being missed.
- Blank columns are not usually a problem (and Excel files often
include 'ghost' columns after the data) - but try to avoid them.
- Prefixes before the Genus name can cause problems (e.g. space,
'-')
- There is a theoretical limit to the number of samples per countsheet
- it seems to be system and context dependent (!) - we recommend
having no more than 70 samples in one countsheet. If you have
more, then split it and import into two countsheets.
|
|
Any number of references can be attached to
a site to help users locate source data and interpretations.
(Skip numbers 1-4 if you are already in edit mode
on the Site Information screen)
|
- Select the site in the Site Manager (from the main toolbar).
- Click the [Show Site Info.] button.
- Click [Edit Site] and enter the Administrator password to enter
edit mode.
- Click the [Add Reference] button on the Site References panel
(bottom right)
- A popup window will open which allows you to either:
- Select an existing reference from the Bugs Bibliography,
or
(use the search or list boxes to find the reference and
click the [Use this...] button)
- Add a New Reference to the Bugs Bibliography
...as explained here...
- Click [Add a New Reference to BugsCEP] and the 'Add Ref...'
window will pop up.
This requests the abbreviated form of the reference - as you would
use within the text of a publication. Enter the abbreviated reference
and click [OK].
You may notice that references concerning fossil beetles have
the date in brackets, and modern ecology references don't - feel
free to prolong the tradition, but it's not essential.
if entered ref exists, then will give options of... |
| |
|
Bibliography notes
can be edited from Edit Bibliography on the Tools dropdown on the
toolbar , in edit more... maybe need to change this later!
|
|
Assign dates to samples at
a site
|
Dates can only be assigned to samples - that
is to say, there is no facility for storing a general site date (although
this can be achieved by assigning broad period dates to all samples
at the site).
|
- Either create a new site or select
an existing one in the Site Manager.
- If the site has no samples, then add some using the Countsheet
Explorer (accessible thorugh the Counthsheet Manager).
- Click the [Dates Explorer] button to open the form with the
same name.
- The samples for the first countsheet at the site will be shown
to the left, arranged by depth (or order of entry if no depths
were given). To change countsheet within a site use the 'Select
Countsheet' dropdown box.
|
 |
|
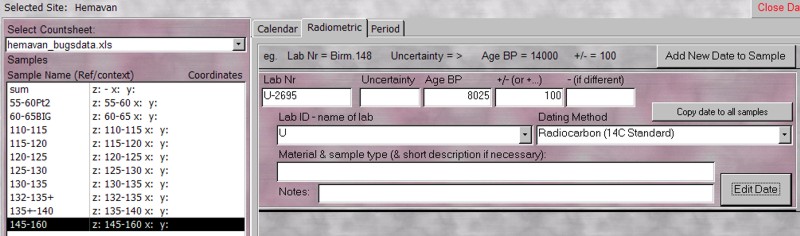
- Select the sample to be assigned a date.
- Click the appropriate tab for the type of data - Calendar/Radiometric/Period
- and click the [Add New Date to Sample] button.
- You can then fill in the details - the fields are pretty self
explanatory, and BugsCEP will let you know if you try to enter
inappropriate data.
- Always click [Save Date] when you finish entering one.
- Dates can be deleted by first clicking [Edit Date], and then
the [Delete Date] button that appears.
|
|
Create a species list for
a site with no samples or only presence values
|
|
BugCEP needs species lists to be assigned abundances
in samples for them to be stored. The workaround is, then, to create
a single sample with abundance '1' for every species.
As this could be a common problem, we've included
the facility to generate single 'presence' samples.
|
- Create a new site or select one
in the Site Manager.
- Click on the [Manage Countsheets & Create Reports] button.
If no counthsheets are present then you will be prompted to either
import or create one (as shown here).
Choose to create one.
If there are countsheets present, click the [Add Countsheet] button
to create a new one.
- Give the countsheet a name and fill in the appropriate context
and type information.
WARNING! BugsCEP may select the first
countsheet for the site after you click [Add Counthsheet] - make
sure you select the new blank one before entering the name.
- Click [Show/Edit abundance data], then [Manage Species List]
and add your species as instructed above.
Click [Apply Changes] when done.
- Back in the Countsheet Explorer click the [Create 'Presence'
dummy sample] button, click [OK] to confirm the action, and then
observe the changes.
|
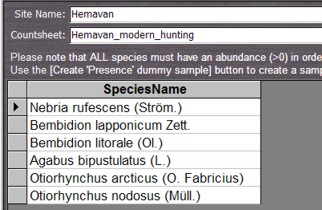
Before...
|
|
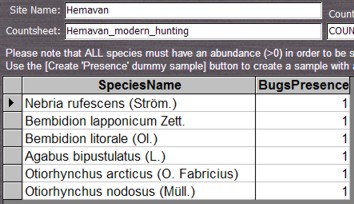
...after. |
|
- Note that you can also use this button to update the 'BugsPresence'
sample if you add mroe species at a later date.
- Click [Save Changes & Update Database] to add the new countsheet
to the database.
|
Latitude/longitude format used in Bugs
In relation to the Grenwich Meridian
| Furthest |
Decimal Degrees
|
Degrees, Minutes, Seconds
|
| East |
+180
|
180°E
|
| West |
-180
|
180°W
|
| North |
+90
|
90°N
|
| South |
-90
|
90°S
|
|